
Build Raspberry Pi Robots

Obstacle avoiding robots are fairly common and easy to make. Here, you can use this project to add object avoidance functionality to your robot. Or simply use it to start messing around with python and the hardware peripherals on raspberry pi. This system uses IR modules to detect objects, but we will get to the technical side later. So, if you have a raspberry pi and want to build something based on hardware using it, just scroll down and have fun :). Check out the video at the bottom to see how the raspberry pi robot works. And if you are a true beginner, you can always use our free eBook on Raspberry Pi and Arduino to get started from step 0.
 |
| Raspberry Pi robot components |
- Raspberry Pi B/B+ or 2 and basic peripherals: SD card, keyboard, mouse, etc.
- IR sensor modules like this.
- Geared DC motors.
- L293D driver board.
- Robot chassis and wheels.
- Caster wheel.
- Breadboard and double side tape.
- Male to male/Female to male jumpers.
- 9V Battery and connectors.
- Push button and 220R resistor.
How does it work?
The entire working of this robot is really simple, nothing to sweat about :) The whole system avoids colliding into obstacles thanks to its onboard sensors. Here, this robot uses two IR sensor modules which can detect objects within a range of 5-6cm. This sensor outputs a digital LOW (0V) signal when there is an object within its range. And outputs a digital HIGH (5V) signal otherwise.
 |
| IR sensor on the raspberry pi robot |
 |
| Raspberry Pi robot |
Step 1: Connecting the IR Sensors for the raspberry pi robot
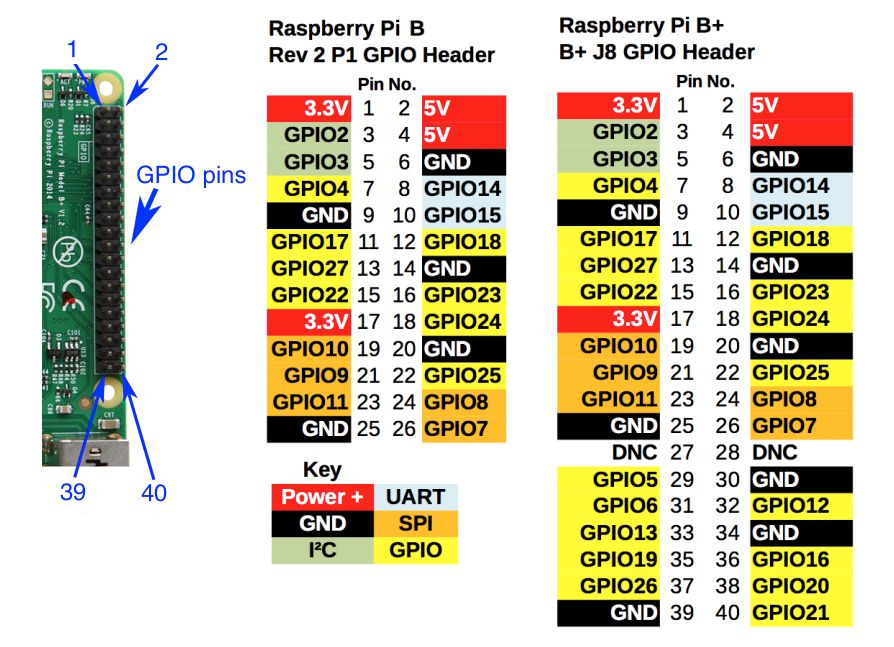 |
| Raspberry Pi GPIO pin out |
First, you need to turn ON your raspberry pi after connecting it to the monitor, keyboard, etc. Then we need to check the IR sensor modules. To do this, connect the IR modules to your raspberry pi as shown in the following diagram. Power the sensor by providing 5V (+ pin), GND (- pin) from the raspberry pi. And connect the B pin on the sensors to raspberry pi’s GPIO pins 3 and 16. You can check out the raspberry pi GPIO pin out as per the pin diagram here. We are using the GPIO.BOARD configuration, which means the pins are numbered based on their normal order on the board (1,2,3,..). Read the pin configuration on the sensor module and connect correspondingly.
 |
| Connection diagram- Raspberry Pi IR sensor |
Next, you need to copy and paste the following code and save it as a python file- irtest.py:
import RPi.GPIO as GPIO
import time
GPIO.setwarnings(False)
GPIO.setmode(GPIO.BOARD)
GPIO.setup(3, GPIO.IN)     #Right sensor connection
GPIO.setup(16, GPIO.IN, pull_up_down=GPIO.PUD_UP) #Left sensor connection
while True:
          i=GPIO.input(3)  #Reading output of right IR sensor
          j=GPIO.input(16) #Reading output of left IR sensor
          if i==0:         #Right IR sensor detects an object
               print "Obstacle detected on Left",i
               time.sleep(0.1)
          elif j==0:       #Left IR sensor detects an object
               print "Obstacle detected on Right",j
               time.sleep(0.1)
 |
| IR sensor output from python |
After testing the IR sensor modules, next you need to connect and test the L293D module and the motors. Power the L293D module by connecting the + and – pins of the board to the 9V battery. Also, connect the “-” of the board to the GND of raspberry pi. You can refer to the connection diagram here for completing the connections:
 |
| Raspberry Pi robot connection diagram |
 |
| L293D raspberry pi control logic |
Next, you need to wire a push button to the raspberry pi as shown in the above connection diagram. This button is used to activate and de activate the robot. After wiring the robot, you need to attach the wheels. Use double side tape to fix the parts together on the robot chassis. After which, you will have a setup that almost looks like this:
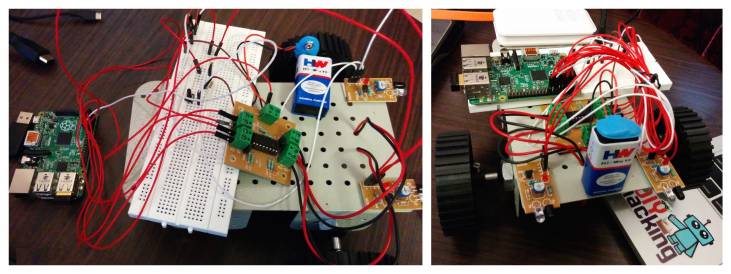 |
| Raspberry Pi robot assembly |
import RPi.GPIO as GPIO
import time
GPIO.setmode(GPIO.BOARD)
GPIO.setup(5,GPIO.OUT)   #Left motor input A
GPIO.setup(7,GPIO.OUT)   #Left motor input B
GPIO.setup(11,GPIO.OUT)  #Right motor input A
GPIO.setup(13,GPIO.OUT)  #Right motor input B
GPIO.setwarnings(False)

while True:
        print "Rotating both motors in clockwise direction"
        GPIO.output(5,1)
        GPIO.output(7,0)
        GPIO.output(11,1)
        GPIO.output(13,0)
        time.sleep(1)     #One second delay

        print "Rotating both motors in anticlockwise direction"
        GPIO.output(5,0)
        GPIO.output(7,1)
        GPIO.output(11,0)
        GPIO.output(13,1)
time.sleep(1) #One second delay After completing all the hardware setup, you need to download and copy this python program from here to your raspberry pi. This program called: robot.py, when executed using this command: sudo python robot.py, will bring life to your robot and it will begin moving when you press the push button. And you will notice how it avoids objects in front of its sensors and navigates freely.
 |
| Raspberry Pi robot DIY Hacking |
After copying the code to your raspberry pi, you can make it truly wireless by using a smartphone battery bank to power it. And a USB wifi dongle to communicate with it. You can either extend the display of your laptop via VNC server and a LAN cable by using this tutorial. Or use SSH to connect remotely to your pi from the terminal wirelessly using this tutorial. And finally, check out the video showing the raspberry pi robot in action:
via diyhacking


